How to Install a Ceiling Light Fixture: The Ultimate Londoner’s DIY Guide
Right then, let’s talk about giving your flat a bit of a facelift. We all know that swapping out a tired, dusty old lamp shade for a sleek, modern fitting is one of the absolute best ways to completely change the vibe of a room. Whether you are doing up a Victorian terrace or modernising a new build, learning how to Install a Ceiling Light Fixture is a brilliant DIY skill to have up your sleeve.
Living in London, finding a reliable tradesperson for a quick job can sometimes be a massive headache. You might find yourself endlessly searching the web for a decent electrical service just to swap a single pendant. While we always recommend getting a proper sparky for the big rewiring jobs, tackling a simple light swap is something you can absolutely do yourself if you follow the right safety steps.
In this comprehensive, step-by-step guide, we’re going to show you exactly how to install a ceiling light fixture safely and securely. This is not just a general tutorial — it’s based on a real project completed for one of our clients in Kew, London, giving you practical insight into how the job is done professionally.
We’ll walk you through every stage of the process, from removing the old fitting to testing the new installation. As a bonus, we’ll also show you how to fit and perfectly level a double dimmer switch, just like experienced electricians do.
Video Transcript:
This installation process demonstrates the essential stages involved when fitting a new ceiling light safely and securely.
The process begins with exposing the ceiling wiring and preparing the area for installation. Once the existing fixture is removed, the electrical wires are inspected and positioned correctly to ensure compatibility with the new light fitting.
Next, the mounting base is aligned and securely fixed to the ceiling, providing a stable foundation for the new fixture. Proper installation of this bracket is crucial for long-term safety and durability.
Following this, the electrical connections are made by matching the live, neutral, and earth wires using secure connectors. Ensuring tight and reliable connections helps prevent electrical faults and guarantees safe operation.
Once connected, the wiring is carefully tucked back into place to avoid strain or damage during installation.
The main light fixture is then lifted into position and attached to the mounting base. Final adjustments ensure the unit sits flush against the ceiling for a clean and professional finish.
The completed installation results in a stable, functional, and visually seamless lighting setup, ready for safe operation.
If you ever get stuck, remember that SMR Group provides a top-tier electrical service across the capital. If you find yourself thinking, I really need an expert near me right now, we’ve always got your back. Grab a cuppa, and let’s get cracking.
If you’re based in:
- Chiswick
- Ealing
- Hammersmith & Fulham
- Holland Park
- Kensington & Chelsea
- Knightsbridge
- Kew
- Kingston upon Thames
- Mayfair
- Putney
- Richmond
- Sutton
- Twickenham
- Wimbledon Village
, you can call SMR GROUP on 07789484208 for a fast, reliable 24-hour emergency electrician. We offer immediate response, competitive pricing, and fully qualified local electricians who can reach you quickly.
⚠️The Golden Rule: Safety First
Before we even look at a screwdriver, we need to have a serious chat about safety. Mains electricity is absolutely nothing to mess about with. It doesn’t matter if you are just trying to quickly Install a Ceiling Light Fixture before your mates come over for dinner; you cannot cut corners here.
- Head to the Consumer Unit: Find your fuse box. Do not just rely on turning the light switch off at the wall. Someone could easily walk into the room and flick the switch back on while your hands are up in the ceiling. Flip the main breaker for the lighting circuit you are working on.
- Test, Test, and Test Again: Get yourself a decent voltage tester pen. Touch it against the wires in the ceiling. If it beeps or flashes red, the power is still live. Only proceed when you are 100% sure the circuit is dead.

Getting Your Kit Together: Tools of the Trade🧰
If you want to Install a Ceiling Light Fixture without losing your temper, you need the right gear sorted before you climb up the ladder. As you might have seen in our instructional videos, having your tool bag prepped on the floor saves a lot of faffing about.
Here is what you will need:
 Insulated Screwdrivers: A set of VDE-approved screwdrivers (usually red and yellow handled). These protect you from accidental shocks.
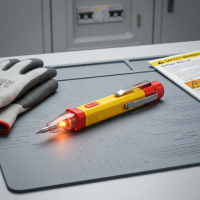 A Voltage Tester Pen: As mentioned, your best mate for safety.
 Wire Strippers: For getting a clean cut on the copper wires.
 WAGO Connectors or Terminal Blocks: In our video tutorials, you’ll spot those brilliant little orange and white push-fit connectors. They are an absolute game-changer compared to the old, fiddly screw terminals.
 A Small Torpedo Level: Essential for making sure your wall switches are dead straight.
-
 A Sturdy Step-Ladder: Don’t balance on a dodgy dining chair!
Step 1: Taking Down the Old Fitting
Right, the power is off, and you’ve double-checked it. Now, it is time to expose the ceiling wiring.
Carefully unscrew the cover of your existing ceiling rose. In a lot of older London flats, you might pull this cover down and be greeted by an absolute bird’s nest of wires. Don’t panic. Gently pull the wires down so they are accessible. Take a clear photo with your phone right now. If you forget which wire goes where, that photo will save you a massive headache later.
Carefully unscrew the wires from the old terminal block and set the old light fixture aside.
Step 2: Understanding Your Wires
This is the bit where people usually get a bit nervous, but it’s actually quite straightforward if you take your time. To successfully Install a Ceiling Light Fixture, you need to match the wires coming out of your ceiling to the wires on your new light.
In the UK, we’ve had a couple of different wiring colour codes over the years. If you live in an older property, you might see the old colours.
Here is the translation:
Modern UK Wiring Colours:
- Live (Power in): Brown🟤
- Neutral (Power out): Blue🔵
- Earth (Safety): Green and Yellow stripes🟢🟡
Old UK Wiring Colours (Pre-2004):
- 🔴Live: Red
- ⚫ Neutral: Black
- 🟡Earth: Bare copper (which should be covered in Green/Yellow sleeving)
Identify which is which. If you have a bundle of red wires looped together in the ceiling, leave them alone—that’s your ring main continuing to the next room. You only want to focus on the specific wire dropping down to power your light (the switched live).
Step 3: Preparing the New Mounting Base
Every new light fitting comes with a metal mounting bracket. This is the backbone of your installation. If you want to properly Install a Ceiling Light Fixture, this bracket needs to be rock solid.
Position the mounting plate against the ceiling. You want to try and screw this directly into a ceiling joist (the solid wooden beams above the plasterboard). If you can’t find a joist and have to screw into hollow plasterboard, make sure you use proper heavy-duty plasterboard fixings (like rawlplugs designed for ceilings).
Align the screw holes and drive your screws in securely. Give it a gentle tug to make sure it can take the weight of your new fancy light.
Step 4: Making the Connections🔌
Now we get to the actual wiring. To reliably Install a Ceiling Light Fixture, the connections must be incredibly secure. Loose wires cause sparks, and sparks cause fires.
If your new light comes with a traditional plastic connector block, insert the stripped copper ends of the ceiling wires into the corresponding slots (Live to Live, Neutral to Neutral, Earth to Earth) and tighten the screws down firmly with your insulated screwdriver.
However, if you are doing a proper modern upgrade, you should use push-fit connectors (like the WAGO clips we use in our video demonstrations). You simply strip back about 10mm of the wire insulation, flip up the little orange lever on the connector, push the wire in, and snap the lever down. It grips the copper tightly and leaves absolutely zero bare wire exposed. It is the absolute best way to Install a Ceiling Light Fixture these days.
Step 5: Tucking it All Away Safely
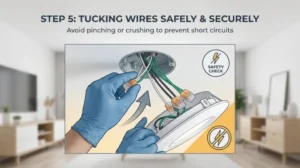
Once your wires are connected, give each one a gentle pull. If a wire pops out, you haven’t secured it properly. Try again.
When you are satisfied that the connections are rock solid and no bare copper is visible, you need to gently tuck the wires back up into the ceiling cavity or inside the base of the light fitting. Do this carefully. You do not want to trap, pinch, or crush any of the wires when you screw the light to the ceiling.
A pinched wire can short out the whole circuit.
If you’re based in:
- Chiswick
- Ealing
- Hammersmith & Fulham
- Holland Park
- Kensington & Chelsea
- Knightsbridge
- Kew
- Kingston upon Thames
- Mayfair
- Putney
- Richmond
- Sutton
- Twickenham
- Wimbledon Village
, you can call SMR GROUP on 07789484208 for a fast, reliable 24-hour emergency electrician. We offer immediate response, competitive pricing, and fully qualified local electricians who can reach you quickly.
🎯Step 6: Securing the Main Fixture
Grab the main body of your beautiful new light fitting. Lift it up and align it over the mounting bracket you installed in Step 2.
Usually, there will be two small screws on the side or pointing straight downwards that lock the fixture to the bracket. Using your screwdriver (or a small electric driver, as seen in our tutorials), tighten these screws evenly. Do a few turns on the left, then a few on the right. This ensures the base plate sits completely flush and flat against your ceiling, leaving no ugly gaps.
Take a step down off the ladder and have a look. If it looks perfectly flat, you’ve done a smashing job.
Step 7: The Final Assembly
You are almost there. The hard graft is done. Now it is time to make it look pretty.
Attach any glass shades, diffusers, or decorative covers that came in the box. Be careful not to cross-thread any delicate glass parts. Finally, pop the correct bulbs in. Always check the maximum wattage sticker on the fitting—putting a 100w bulb into a fitting rated for 40w is a massive fire hazard.
Stick to modern LED bulbs; they run brilliantly cool, save you a fortune on your electric bill, and last for ages.
Step 8: The Moment of Truth (Testing)🎉
It is time to see if your hard work has paid off. Clear your tools out of the way, head back to your consumer unit, and flip the lighting circuit breaker back on.
Walk back into the room and confidently flick the wall switch. If the room floods with glorious light and nothing goes pop, give yourself a massive pat on the back. You have successfully managed to Install a Ceiling Light Fixture all by yourself!
🎛️Bonus Pro-Tip: Installing a Double Dimmer Switch
While we are on the topic of upgrading your lighting, let’s talk about the wall switches. Putting up a nice new ceiling light is great, but pairing it with a modern double dimmer switch takes the room to the next level. In our recent video tutorials, we demonstrated exactly how to do this in a real London home renovation setting.
If you are swapping an old switch for a dimmer, the safety rules are exactly the same: isolate the power first!
When you pull the old switch away from the wall box, you’ll see the red and black (or brown and blue) wires. A double dimmer has two separate control modules on the back. You need to carefully wire the ‘Common’ and ‘L1’ terminals for each switch.
The Secret to a Perfect Finish:
The biggest mistake DIYers make when fitting new wall plates is screwing them in crooked. Nothing ruins the look of a freshly painted wall like a wonky light switch.
In our video, you’ll notice our installer using a tiny red and green torpedo level. When you push the dimmer switch back into the wall box, don’t just tighten the screws straight away. Place the torpedo level flat across the top edge of the shiny new faceplate. Adjust the switch left or right until the little bubble is dead centre between the lines. Hold it firmly in that position with one hand, and use your screwdriver to tighten the faceplate screws with the other. This guarantees a flawlessly straight, professional finish every single time.
If you’re based in:
- Chiswick
- Ealing
- Hammersmith & Fulham
- Holland Park
- Kensington & Chelsea
- Knightsbridge
- Kew
- Kingston upon Thames
- Mayfair
- Putney
- Richmond
- Sutton
- Twickenham
- Wimbledon Village
, you can call SMR GROUP on 07789484208 for a fast, reliable 24-hour emergency electrician. We offer immediate response, competitive pricing, and fully qualified local electricians who can reach you quickly.
🚨When DIY Goes Wrong: Call in the Cavalry
Look, we are all for giving things a go yourself. Learning to Install a Ceiling Light Fixture is incredibly rewarding. But sometimes, you pull a light down and discover an absolute nightmare.
If you live in an older London property, you might find wires wrapped in old, crumbly rubber that turns to dust when you touch it. You might find completely random wire colours that make zero sense, or you might find that the previous owner did some wildly dangerous DIY wiring of their own.
If you ever feel out of your depth, stop immediately. Put some electrical tape over the bare wire ends, turn the power back on for the rest of the house, and call a professional.
This is exactly where SMR Group comes in. We offer a rapid, fully certified electrical service for homeowners and landlords alike. We know exactly how stressful it is when your house is plunged into darkness and you are frantically googling for an electrician near me.
Our team doesn’t just do massive commercial jobs; we handle the domestic stuff too. Whether you need a full house rewire, a fault diagnosed, or you just want a professional to Install a Ceiling Light Fixture because you don’t fancy climbing a ladder, our electrical service is quite frankly second to none. We pride ourselves on being the most reliable, friendly, and transparent experts in town. So, the next time you need a trusted sparky near me, don’t mess about—give SMR Group a bell.
Final Thoughts on Your Lighting Project
Upgrading your home’s lighting is one of the most cost-effective ways to add real value and comfort to your flat. It sets the mood, highlights your furniture, and just makes the place feel more like home.
Take your time, respect the electricity, use the proper insulated tools, and follow the steps we’ve laid out above. Check those WAGO connections, use your torpedo level for the wall switches, and never rush the job. If you follow this guide, you will be well equipped to safely Install a Ceiling Light Fixture and bring a brilliant new spark of life into your living space.
And remember, whether it’s a simple light swap, a tricky double dimmer, or a complete wiring overhaul, SMR Group is the ultimate electrical service ready to help you out. Bookmark our page so the next time you are searching for a brilliant electrician near me anywhere in London, you know exactly who to call. Stay safe, happy DIYing, and enjoy your brilliant new lights!
Video Transcript:
This installation process demonstrates the essential stages involved when fitting a new ceiling light safely and securely.
The process begins with exposing the ceiling wiring and preparing the area for installation. Once the existing fixture is removed, the electrical wires are inspected and positioned correctly to ensure compatibility with the new light fitting.
Next, the mounting base is aligned and securely fixed to the ceiling, providing a stable foundation for the new fixture. Proper installation of this bracket is crucial for long-term safety and durability.
Following this, the electrical connections are made by matching the live, neutral, and earth wires using secure connectors. Ensuring tight and reliable connections helps prevent electrical faults and guarantees safe operation.
Once connected, the wiring is carefully tucked back into place to avoid strain or damage during installation.
The main light fixture is then lifted into position and attached to the mounting base. Final adjustments ensure the unit sits flush against the ceiling for a clean and professional finish.
The completed installation results in a stable, functional, and visually seamless lighting setup, ready for safe operation.
Related articles:
- Reliable Electrical Services Near Me in London
- Electrical Repairs in London Cost Guide for Homes
- Emergancy Electricians in London
- Comparing Local Electricians in London
- Electrical Safety Certificates – London Homeowner’s Guide
Written and produced by : SMR Group
